Hack Like a Pro: How to Conduct a Simple Man-in-the-Middle Attack
Welcome back, my hacker novitiates!
Many of you have
probably heard of a man-in-the-middle attack and wondered how difficult
an attack like that would be. For those of you who've never heard of
one, it's simply where we, the hacker, place ourselves between the
victim and the server and send and receive all the communication between
the two.
It should be totally transparent to both the client and
the server with neither suspecting they're connected to anything or
anyone but who they expect. This allows us to see and read all of the
communication (passwords, confidential information, etc.), as well as
alter it, if need be.
In this "Hack Like a Pro" tutorial, I'll show you a very simple way to conduct a MitM attack and capture unencrypted traffic.
The Art of Sniffing
Before we embark
on a MitM attack, we need to address a few concepts. First, sniffing is
the act of grabbing all of the traffic that passes you over the wired or
wireless communication. There are a number of tools that will enable
you to do this. Most famously, Wireshark, but also tcpdump, dsniff, and a handful of others.
Enter Promiscuous Mode
In order to see and grab traffic other than your own, you need to first put your NIC or wireless adapter into promiscuous mode
(called monitor mode in wireless), meaning that it will pick up ALL
traffic, not just that intended for your MAC/IP address. In wireless and
wired networks with hubs, this can be accomplished relatively easily.
In a switched environment, we need to be a bit more creative.
Switches & Spoofing
Switches are
designed to reduce network traffic and congestion by isolating traffic
and only sending packets to a particular IP address or MAC address
that's the destination, unlike hubs that send all traffic to all NICs.
This means that my NIC only sees traffic intended for it, if the switch
is doing its job. This makes it harder, but not impossible to sniff and
thereby conduct a MiTM attack.
To defeat the switches task of
isolating network traffic, a number of strategies have been attempted.
On older switches, you could flood them with ARPs and the switch would
flood and fail open. These means that it would begin to act like a hub,
sending all the traffic to all the NICs, enabling the hacker to sniff
other people's traffic.
This strategy no longer works on modern
switches and even on the older ones, a vigilant network admin is going
to notice the change in network traffic and volume.
In order for
switches to "know" where to send traffic, they maintain a CAM table that
essentially maps IP addresses to MAC addresses. This table says that
when traffic is intended for IP address 192.168.1.101, for instance,
send that traffic to MAC address 11:22:33:44:EE:FF (example MAC
address).
If we can change the entries in that table, we can
successfully get someone else's traffic. This is called ARP spoofing,
because the entries in the CAM table come from ARPs that are sent out by
the switch to gather this information from the NIC.
ARP Spoofing for a MitM Attack
What we will be doing here, is using ARP spoofing
to place ourselves between two machines making the client believe we
are the server and the server believe we are the client. With this, we
can then send all the traffic through our computer and sniff every
packet that goes in either direction.
Hope all that makes sense! Let's get started with our MitM attack by opening up BackTrack!
Step 1: Open Three Terminals
To conduct this
MitM attack, we're going to need three (3) terminals, so go ahead and
open those now. Our goal here is to get a client on our network to
believe we are the server and the server to believe we are the client.
arpspoof can do this for us by replacing the MAC address of the client and the server with our MAC address in the ARP table.
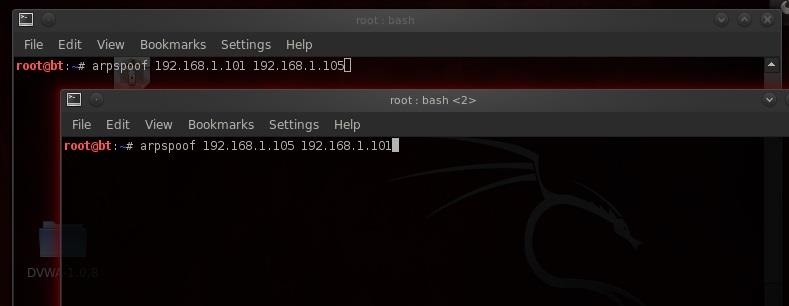
Step 2: Arpspoof Client to Server
Let's start with the client. We want to replace the MAC address of the server with our MAC address.
arpspoof 192.168.1.101 192.168.1.105
Where:
192.168.1.101 is the IP of the client
192.168.1.105 is the IP of the server
In this step, we're telling the client that we are the server.
Step 3: Arpspoof Server to Client
Now we want to
replace the MAC address of the client with our address, so we simply
reverse the order of the IP addresses in the previous command.
arpspoof 192.168.1.105 192.168.1.101
Here, we are telling the server that we are the client.
Now
execute both of these commands. When we do this, the client will think
we are the server and the server will think we are the client!
Step 4: Pass Packets with Ipforward
Now that we
are impersonating both the client and server, we need to be able to pass
or forward the packets to the other machine. In other words, we want
the packets coming from the server to be forwarded to the client and
those coming from the client forwarded to the server.
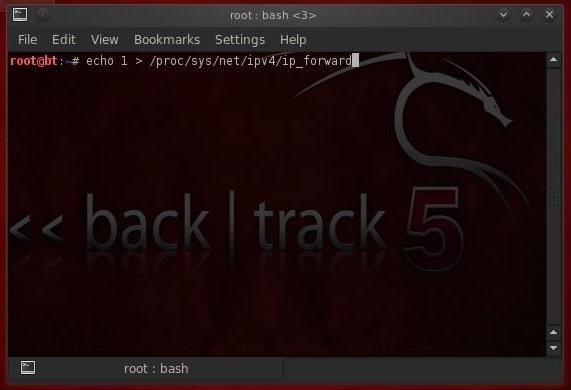
We do this in Linux by using the ip_forward.
Linux has a built-in functionality to forward packets it receives. By
default, it's turned off, but we can turn it on by changing its value to
1(ON).
We simply echo a 1 and direct (>) it to /proc/sys/net/ipv4/ip_forward, thereby turning on ipforwarding.
echo 1 > /proc/sys/net/ipv4/ip_forward
Image via wonderhowto.com Now our system, in the middle, is forwarding the traffic it receives to both ends of this connection, client and server.
Step 5: Sniff the Traffic with Dsniff
Now that
we have all the traffic coming from the client to the server and the
server to the client going through our computer, we can sniff and see
all the traffic!
To do this, we could use a number of different
sniffing tools, including Wireshark or tcpdump, but in this case we'll
use Dug Song's dsniff. Song designed dsniff to sniff
out authentication information that appears on the wire in clear text
(non-encrypted). So, protocols such as ftp, telnet, HTTP, SNMP, POP,
LDAP, etc. can be sniffed off the wire.
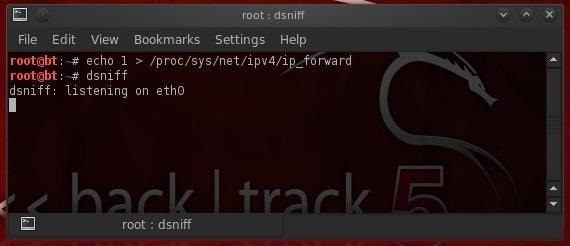
To activate dsniff, we simply type:
dsniff
Image via wonderhowto.com As we can see, dsniff responds that it is listening on eth0.
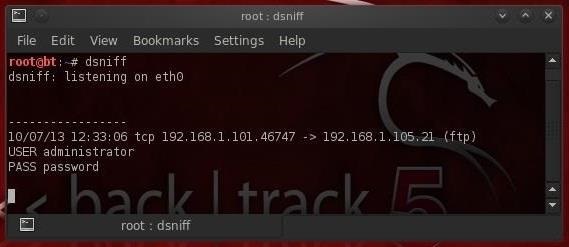
Step 6: Grab the FTP Credentials
Now, let's wait
until the client logs into the ftp server. When he does so, dsniff will
grab his credentials and display them to us.
Image via wonderhowto.com As
you see in the screenshot above, dsniff has grabbed the ftp credentials
of the administrator with the password of "password"! How easy was
that!
It's important to note that users and administrators often
use that same username and password on all services and systems. Now
that we have the admin's ftp password, the next step is to try to log in
with it.
In my next MitM tutorial, I'll show you how to sniff encrypted credentials off the wire, so keep coming back!
Um pesquisador de segurança grego, chamado George Chatzisofroniou, desenvolveu uma ferramenta de engenharia social WiFi que é projetado para roubar credenciais de usuários de redes Wi-Fi segura. A ferramenta, batizada WiFiPhisher, foi lançado no site do desenvolvimento de software GitHub no domingo e está disponível gratuitamente para os usuários. "É um ataque de engenharia social que não usa força bruta, em contraste com outros métodos. É uma maneira fácil de obter senhas WPA", disse George Chatzisofroniou. No entanto, existem várias ferramentas de hacker disponíveis na Internet que pode cortar de uma rede Wi-Fi segura, mas esta ferramenta automatiza múltipla Wi-Fi técnicas que o tornam um pouco diferente dos outros hackers. Ferramenta WiFiPhisher usa ataque "gêmeo do mal " cenário. O mesmo que o gêmeo do mal, a ferramenta cria primeiro um ponto de acesso sem fio falso (AP) mascarar-se como o legítimo Wi-Fi AP. Em seguida, ele dirige uma negação de...
Como você poderia encontrar WPS Routers ativado? Sério é muito fácil de encontrar WPS habilitado roteadores, mas depois que eu postei o meu tutorial sobre como cortar o WPA / WPA2 WiFi Protected muitos povos me enviado mensagens para saber como eles poderiam encontrar WPS habilitado router? por isso é muito simples e limitado a um comando único sim, vamos usar o comando de lavagem para esse fim. O comando que podemos utilizar para encontrar WPS habilitado roteadores está abaixo. wash -i mon0 -C Tenha em mente que o "C" neste alfabeto "C" deve ser a capital Também tenha em mente antes de entrar este comando por favor ligar o interface de moniter ou este comando não funciona mais assim para que você moniter tipo de interface o comando abaixo primeiro e depois tentar digitalizar routers WPS habilitados. airmon-ng start wlan0 Agora isso vai lhe dar todos os roteadores que possuem botão WPS / push ativado em cima delas e você pode tentar cortar-lhes a seu p...
ABOUT Tsunami is forked from Namescan . It is an open source project by Samiux (GPLv3). It is designed for research and testing your firewalls as well as IDS/IPS. Do NOT think of using this tool to attack. It is very expensive due to its poor performance. The effect may be differ due to the bandwidth, number of sessions and the size of feedback from the domain query as well as the power of the tool. All the features of Namescan are included in Tsunami. That means, you can use Tsunami as a scanner too. Please note that Namescan features/functions cannot be used with Tsunami functions. KNOW ISSUE The performance of this tool is very very poor. Tsunami only works on Kali Linux 1.0.9a or above. Other linux distributions may not working properly. The -p switch, do not set more than 1000 as it will consume a lot of memory. FEATURE Tsunami will spoof the MAC address on every session and it will be changed on the next session....


Comentários
Postar um comentário